Chapter 37
Retinoscopy
JONATHAN D. WIRTSCHAFTER and GARY S. SCHWARTZ
Main Menu   Table Of Contents

Search

HISTORY OF THE RETINOSCOPE
OPTICS OF THE RETINOSCOPE
OPHTHALMOSCOPIC RETINOSCOPY
NEUTRALIZATION RETINOSCOPY
TECHNIQUES TO EVALUATE ASTIGMATISM
RELIABILITY
REFERENCES

Retinoscopy is the most practical, manual method of objective refraction. Classic textbooks of ophthalmology1 and visual optics2,3 have stressed that the practice of retinoscopy4,5 follows easily from an understanding of the optics of the retinoscope, whereas monographs on practical retinoscopy concentrate on the technique in simplified ways that may offend the textbook authors but still represent a level of sophistication beyond the observed behavior of most practitioners. Most practitioners relegate retinoscopy to others, and if asked about it, would merely restate what they remember about neutralization: “With reflex, add plus; against reflex, add minus.” The goal of this chapter is to increase the usefulness of the retinoscope to the practitioner by encouraging the use of ophthalmoscopic retinoscopy while reviewing the basis for the more commonly used neutralization retinoscopy.

The goal of objective refraction is to locate the far point of the spherical eye or the two far-point planes of an astigmatic one. Although the retinoscope offers more than two techniques with which to locate the far point, the most important are ophthalmoscopic retinoscopy and neutralization retinoscopy. Ophthalmoscopic retinoscopy locates the far point in space by varying the illumination system and observing the image of the retinoscope filament on the retina. Neutralization retinoscopy is a technique that brings the patient's far point to a location that is a predetermined distance from the patient, the working distance, usually 66 cm (1.50 diopters [D]) in front of the eye, through the use of lenses. Neutralization retinoscopy has a well-defined and rather accurate end point, and, in contrast to ophthalmoscopic retinoscopy, varies the observation system to observe the image from the illuminated retina. Although ophthalmoscopic retinoscopy is faster than neutralization retinoscopy, use of the two techniques in conjunction often requires less time than neutralization alone, especially in difficult cases. There is simply no reason to spend more than 5 minutes neutralizing an eye when ophthalmoscopic retinoscopy can quickly reveal the source of the difficulty.

Ophthalmoscopic retinoscopy is often referred to as “estimation,” and, in fact, works well to estimate a patient's refractive error. However, certain modifications of the neutralization retinoscopy technique can also enable the retinoscopist to estimate the patient's refractive error. These techniques depend primarily on magnification and enhancement of the observed image, and to a lesser extent on observation of the “with and against” or “scissors” reflexes. Our hope is that in studying this chapter, the reader will enhance his or her skills in using the retinoscope, thus increasing both speed and accuracy.

We would like this chapter to be read at two levels. First, we hope it will be useful for the clinician merely hoping to improve his or her clinical skills in using the retinoscope, and in this regard, this chapter should serve as a how-to guide. Second, we would like this text to serve as an initial reference for those wishing to understand the optics and retinoscope in greater detail. In this respect, we have provided information on topics that go beyond the minimum information required for performing ophthalmoscopic and neutralization retinoscopy.

Back to Top
HISTORY OF THE RETINOSCOPE
The observations that led to clinical retinoscopy were made in 1859 with a plane mirror ophthalmoscope lighted by a candle, when Sir William Bowman noted a linear shadow seen when examining an astigmatic eye. By 1875, the optics were explained and the procedure was described as a “shadow test,” an allusion to neutralization. H. Parent coined the term retinoscopy in 1881, but the term is somewhat of a misnomer because the technique actually provides an ophthalmoscopic view of the light reflected from a patch of retina. The earliest retinoscopes used a mirror to reflect a candle, which produced a “spot” of light. It was soon discovered that a linear streak of light could be produced with slit-shaped mirrors. Early electric retinoscopes used spiral filament bulbs and a rotating slit. Jacob Copeland introduced a linear filament bulb that produced a sharp, bright line of light.4,6–8 The Copeland streak retinoscope set the standard for future retinoscopic developments.9,10 As with any instrument, many advances have been incorporated over the years, and innovations continue to this day, incrementally improving the viewing system, control of vergence and filament meridians, handle and sleeve design, and battery power.
Back to Top
OPTICS OF THE RETINOSCOPE
The streak retinoscope has supplanted the spot retinoscope in the modern eye clinic, and only the streak retinoscope is discussed in this chapter. Although the various brands of streak retinoscopes differ in design, they all work similarly. Light is produced by a luminous filament within the base of the handle and emanates from a mirror in the head as a linear streak, with both orientation and vergence controlled by the retinoscopist. The streak of light passes through the patient's tear film, cornea, anterior chamber, lens, vitreous chamber, and retina. It is then reflected from the choroid and retinal pigment epithelium as a linear red reflex that passes back through the sensory retina, vitreous, lens, aqueous, cornea, and tear film, through the air between the patient and the examiner, and into the head of the retinoscope, through an aperture in the mirror, finally exiting through the back of the retinoscope into the retinoscopist's own eye. By observing qualities of the reflected light (the reflex) after it leaves the patient's eye, the retinoscopist can make determinations about the patient's refractive state.

Explaining the optics and proper usage of the retinoscope can be a confusing business. To help simplify the text, we have chosen to use the feminine pronouns (e.g., “she” and “her”) when referring to the retinoscopist, and the masculine ones (e.g., “he,” “him,” and “his”) when referring to the patient.

All streak retinoscopes are made of the same fundamental components: light source, condensing lens, mirror, and sleeve (Fig. 1). The light source is a light bulb with a fine, linear filament, which projects a fine, linear streak of light with the passage of an electric current. The filament (which should be considered a linear point source of light), and therefore the streak, can be rotated 360 degrees by rotating the sleeve of the retinoscope. Currently, most retinoscopes use a halogen bulb, which projects a very bright streak. The condensing lens is a plus lens, which exerts positive vergence on the streak, which is emitted from the point-source filament in a highly diverging manner. The position of the lens in relation to the light filament can be altered by raising or lowering the sleeve. In this way, the vergence of the streak that is emitted from the retinoscope can be controlled by the retinoscopist, as described subsequently.

Fig. 1. Diagrammatic cross-section of streak retinoscope. Light from the filament passes through the lens to the mirror, where it is reflected toward the patient. The examiner views through the aperture behind the mirror. The arrows represent the two controllable functions. The curved arrow indicates that the bulb may be rotated. The straight arrow indicates that the vergence of the light rays may be altered by changing the filament to lens distance. The filament is shown at the focal length of the lens so that parallel light rays emerge. (Weinstock SM, Wirtschafter JD: A Decision-Oriented Manual of Retinoscopy. Springfield, IL: Charles C Thomas, 1976.)

The mirror bends light that originates in the handle and is initially projected upward toward the ceiling, to instead exit the retinoscope along an axis parallel to the floor so that it can be projected into the patient's eye. The mirror should not reflect 100% of visible light; rather, it must allow some light to pass through it. Only in this way can the retinoscopist have a view into the patient's pupil that is coaxial to the path of the streak.

OPTICS OF THE PEEPHOLE

The true peephole of the retinoscope is not the hole on the examiner's side of the instrument; rather, it is a “hole” in the reflecting mirror. The peephole may be manufactured in two basic ways. One is to leave a round area of the mirror unsilvered, whereas the other is to partially silver the mirror so that it acts as a beam splitter. The size of the hole is also a consideration in the design of the instrument. A large hole decreases the useful light reflected into the subject's eye. At the expense of internal reflections, the beam-splitter helps provide light needed by the retinoscopist to find the subject's pupil and to maintain a coaxial position. To decrease glare and polarization, some retinoscopes introduce filters between the true peephole and the back of the retinoscope peephole.

The peephole allows the retinoscopist's view into the patient's eye to be coaxial to light emitted from the retinoscope. If this coaxial relationship between the path of the retinoscopist's line of sight and the emitted streak is not established, or she will not see a red-reflex image of the streak. Instead, only the patient's black pupil will be seen, and the retinoscopist cannot obtain any information regarding the patient's refractive status. Tilting the retinoscope allows some areas of the retinal reflex to be seen through the peephole while other portions are cut off and are perceived as a dark shadow in the subject's pupil.

CONTROLLING THE PROPERTIES OF THE RETINOSCOPE

The basic idea behind the retinoscope is that the retinoscopist creates a streak of light, projects it into a patient's eye, bounces it off his retina, and makes deductions concerning the patient's refractive status based on what the image of that streak looks like when it reaches the retinoscopist's eye. To aid her in this task, the retinoscopist has control over, and can easily vary, certain aspects of the system. Two things she can control have nothing to do with the intrinsic properties of the retinoscope she is holding—the distance between the retinoscopist's eye and the patient's, and which lenses she may be holding between the patient's eye and her own; thus, these are not discussed in this section.

However, two properties over which the retinoscopist has total control are completely intrinsic to the retinoscope she is holding. The first is the orientation of the streak as it leaves the retinoscope. Because the light source for the retinoscope is a fine filament, the light emanates from the retinoscope as a fine streak. By rotating the light source, the retinoscopist can easily alter the orientation of the streak by more than 360 degrees. Merely by rotating the sleeve on the handle of the retinoscope, she can project a streak whose orientation is parallel to the floor, or perpendicular to it, or any meridian in between. This feature of the retinoscope proves invaluable when examining patients with astigmatism.

The second property that can be controlled easily by the retinoscopist is the vergence of the incident streak. With the touch of a finger (or thumb), the retinoscopist can alter the streak so that it leaves the retinoscope as converging, diverging, or even parallel light. This feature gives the retinoscopist an incredible amount of power in evaluating a patient's refractive state. Unfortunately, it is probably the most underused feature of the retinoscope. The average retinoscopist uses only diverging light (plane mirror) when performing an objective refraction, and therefore limits what she can truly accomplish with the apparatus.

Changing the distance between the light filament and the condensing lens alters the vergence of the emitted streak. This can be accomplished by raising or lowering the sleeve in the handle of the retinoscope. This is the most fundamental way in which different models of retinoscope will contrast, and it is obviously important for the retinoscopist to be familiar with the type of retinoscope with which she is working. In the earliest models of retinoscopes (e.g., Bausch and Lomb Copeland [1928] and Copeland-Optec 360 [1958]), the condensing lens is fixed, and the light source can be raised or lowered by moving the sleeve up or down (Fig. 2). When the sleeve is raised in these retinoscopes, the streak emanates as a diverging beam; when the sleeve is lowered, the streak emanates in a converging nature. Most current textbooks on retinoscopy techniques use this type of retinoscope in their discussions4,5 and therefore use the term “sleeve up” when the retinoscope emits diverging light and “sleeve down” when it emits converging light.

Fig. 2. Optical effects of moving the retinoscope bulb to change the filament to lens distance; this type of retinoscope emits convergent light when the sleeve is moved up. Note the vergences of the emerging rays: (left) concave mirror effect is produced when bulb is moved down; (right) plane mirror effect is produced when bulb is moved up. (Weinstock SM, Wirtschafter JD: A Decision-Oriented Manual of Retinoscopy. Springfield, IL: Charles C Thomas, 1976.)

In the U.S. market, retinoscopes that emit a converging beam with the sleeve down have largely been supplanted with retinoscopes in which the light source is fixed and the condensing lens can be raised or lowered by moving the sleeve up or down (Fig. 3). Examples of this type of retinoscope include those made by Welch Allyn, Heine, Neitz, and Keeler. In these retinoscopes, when the sleeve is raised, the streak emanates as a converging beam, and when the sleeve is lowered, the streak emanates as a diverging beam. These retinoscopes have a more complex linkage than the retinoscope described previously because the sleeve has two different control functions: to raise or lower the lens and to rotate the bulb filament.

Fig. 3. Optical effects of moving the lens to change the filament to lens distance; this type of retinoscope emits convergent light when the sleeve is moved up. Note the vergences of the emerging rays: (left) plane mirror effect when lens is moved down; (right) concave mirror effect when lens is moved up. (Weinstock SM, Wirtschafter JD: A Decision-Oriented Manual of Retinoscopy. Springfield, IL: Charles C Thomas, 1976.)

The Copeland streak retinoscope traditionally has been the standard against which others have been compared. However, our informal survey of optical instrument distribution reveals that retinoscopes that converge with the sleeve down are being used in fewer and fewer ophthalmology offices because more clinicians prefer the Welch Allyn, Heine, Neitz, or Keeler models. The reasons for this are a mix of technical (i.e., compatibility of instrument design with rechargeable battery handles) and marketing aspects. Regardless, the market currently is dominated by retinoscopes that converge when the sleeve is up. Therefore, this chapter takes a departure from prior retinoscopy textbooks and use the nomenclature sleeve down to mean that the streak is emitted as diverging light and sleeve up to mean that the streak is emitted as converging light. The reader must be familiar with her own retinoscope. When using a Bausch and Lomb Copeland, Copeland-Optec 360, or other type with a movable light source and fixed condensing lens, she must be aware that the sleeve position should be in the down position when we use the term sleeve up and should be in the up position when we use the term sleeve down.

By altering the vergence of the emitted streak, the retinoscopist is actually manipulating its focal point, the point where the emitted light comes to focus in a point in real or virtual space. When in maximum convergence (sleeve up), that focal point is a real image located 33 cm in front of the retinoscope. (You can test this by moving the palm of your hand in front of the retinoscope at a distance of 33 cm, then turning it on with the sleeve raised all the way up. You should see the image of the filament in perfect focus on the palm of your hand.) As the sleeve is lowered, the focal point moves farther from the retinoscope (aim the retinoscope at a wall and recede) until a point where the sleeve is roughly two thirds of the way down, when the streak is emitted as parallel light and the focal point is at infinity. If the retinoscopist continues to lower the sleeve of the retinoscope, the focal point is created in virtual space far behind her. As she lowers the sleeve more, the focal point moves closer to her until the sleeve is lowered all the way, and the focal point is 40 cm behind her. At no time can the focal point of the streak emanating from the retinoscope be located between 33 cm in front of and 40 cm behind the retinoscope. In other words, the retinoscope cannot project the streak to the region in space that the retinoscope itself occupies. Thus, the retinoscopist must know the location of the converging and diverging focal points of her retinoscope to use it to its full potential.

DETERMINING THE VERGENCE OF THE RETINOSCOPE BEAM

To determine the vergence of a retinoscope at any sleeve adjustment, a simple trick called Foucault's Method (Fig. 4) can be used. The most instructive part of this exercise is shown in Figure 4A. Note that when a card is introduced at the edge of a converging beam, an opposite movement is produced on a screen located beyond the focal point.

Fig. 4. Foucault's method for determining vergence of rays emerging from a retinoscope. A card or your hand is introduced close to the retinoscope and moved at right angles to the emerging rays. Observe the shadow produced in the unfocused image on a screen or wall in a darkened room. A. Rays converging at a focal point before screen cause an “against” motion. B. Rays converging beyond screen cause a “with” motion. C. Diverging rays cause a “with” motion. (Weinstock SM, Wirtschafter JD: A Decision-Oriented Manual of Retinoscopy. Springfield, IL: Charles C Thomas, 1976.)

CALIBRATING THE RETINOSCOPE SLEEVE

Perform calibration in a semidarkened examining room with a 20-foot distance from the phoropter to the distant wall. Turn on the retinoscope.

Calibration of the Converging Beam

Bring the sleeve all the way up and place it against a reflecting surface such as the wall. Move away from the wall and observe from the side (not through the peephole) until the streak is in sharp focus on the wall. You should note that when the retinoscope is moved beyond that distance, the streak will go out of focus because the filament light has converged and then diverged (see Fig. 4A). Return to the point of sharp focus and measure to determine the focal point of the retinoscope: it should be about 33 cm, which corresponds to + 3.00 D.

Calibration of the Parallel Beam

Sit in the patient's examination chair and aim the retinoscope toward the distant wall while moving the sleeve up and down. Watch where the finest focused image of the filament is observed. Note the relative position of the bottom of the sleeve with regard to the range of sleeve movement. In that position, the retinoscope beam is as parallel as possible and it has no vergence and thus is focused at infinity. The Heine retinoscope has a mechanical stop (Para Stop) at the parallel beam position that can be engaged to prevent the vergence control from being adjusted to a convergent beam. This position can be used as the plano calibration.

Calibration of the Diverging Beam

Sit in the patient's examination chair and place the retinoscope immediately adjacent to the patient's side of the phoropter. Aim the retinoscope through the phoropter eyehole and onto the distant wall. Do not look through the retinoscope or the phoropter. Move the sleeve all the way down and select the trial lens that allows for the sharpest focus. The divergent beam of the retinoscope will be brought to convergence at infinity when you neutralize it with some lens between + 1.50 to + 2.25 D. Different models of retinoscope vary as to where in space light can be focused behind them. For example, the Heine retinoscope focuses light to 44 cm behind it (-2.25 D), the Welch Allyn focuses light 50 cm behind it (-2.00 D), and the Copeland-Optek cannot focus light to any closer than 66 cm behind it (-1.50 D).

Although the retinoscopist should be aware of the convergence and divergence focal points of the retinoscope that she uses, in truth, very few retinoscopists actually go through the small amount of trouble to measure them.

You have now calibrated the sleeve of your retinoscope and determined that it has an ophthalmoscopic retinoscopy focusing range of 4.00 D of hyperopia to 2.25 D (or 2.00 D or 1.50 D, depending on the model) of myopia. You can record these measurements on a label affixed to the side of the retinoscope (Fig. 5) or simply remember them because you are using the scale only for the estimate. The most useful aspect of the label is the position of plano.

Fig. 5. Ophthalmoscopic retinoscopy scale applied to the sleeve case of a Heine retinoscope. The scale corresponds to the approximate focus of the instrument when used at 5 cm from the subject's eye. The reading is taken from the bottom of the sleeve. In this figure, the sleeve is adjusted for the plano. (Reproduced with permission fo the Regents of the University of Minnesota. Copyright 2000.)

Back to Top
OPHTHALMOSCOPIC RETINOSCOPY
Copeland taught methods for refracting an individual with a retinoscope that relied on neither lenses nor verbal responses from the patient. His technique relied on the recognition of a focused “ophthalmoscopic” image of the retinoscope. Although Dr Copeland's skills at ophthalmoscopic retinoscopy were such that he could write a spectacle prescription based on information garnered from this technique alone, most of us use it only as a technique of estimating the refractive error, and few of us feel comfortable enough with our skills to rely solely on this method. However, ophthalmoscopic retinoscopy is a valuable technique to use as a prelude to neutralization, especially in a patient with an unknown refraction. It is quick, easy, and accurate. It was especially useful when practitioners refracted with loose lenses, where they could benefit from any technique that would decrease the number of “trips” they had to make to the trial lens case. However, now that most ophthalmic examination rooms are equipped with phoropters rather than trial lenses, estimation techniques tend to be underused, and most retinoscopists skip ophthalmoscopic retinoscopy altogether, and merely dive headlong into neutralization. We have chosen to replace terms such as “estimation techniques” with “ophthalmoscopic retinoscopy” to indicate a coherent optical basis rather than describe a collection of estimating “tricks.”

Ophthalmoscopic retinoscopy is quite helpful for the cycloplegic refraction of uncooperative infants and children, for patients being examined under anesthesia, or in any circumstance when the first attempt at neutralization does not yield a useful reflex. Most retinoscopists who only use the retinoscope for neutralization retinoscopy may be unfamiliar with the technique of estimation by ophthalmoscopic retinoscopy (Table 1).


TABLE 1. Differences Between Ophthalmoscopic Retinoscopy and Neutralization Retinoscopy


 Ophthalmoscopic RetinoscopyNeutralization Retinoscopy
Refractive status before examinationCompletely unknown and uncorrectedKnown and almost perfectly corrected
Refractive conditions analyzedHighly difficult, high ametropia and astigmatismSimple ametropia or emmetropia
Refractive purposeEstimationCompletion*
Time required per eye< 1 min1–5 min
Far pointLocatesConfirms desired location
Working rangeSleeve height†Use of trial or phoropter lenses
End point5–66 cmSpirals from down to up
Never, initiallySharply focused, nonmoving image66 cm
Sleeve always downAlmost alwaysBlurred, fast-moving image; “on-off” phenomenon
Optical principleVarying the illuminating system vergence to observe image “on” retinaVarying the observation system to observe the image “from” the retina

*Can also be used for estimation of eyes whose net refractive errors are between 1.50 to 3.00.
†For retinoscopes whose beam diverges with sleeve down.


The reader must understand four specific differences between the performance of ophthalmoscopic retinoscopy and neutralization retinoscopy. First, during ophthalmoscopic retinoscopy, the working distance starts at 5 cm from the patient and ends at 66 cm, whereas the working distance remains at 66 cm for neutralization retinoscopy (Fig. 6). Second, the sleeve is “spiraled” up during ophthalmoscopic retinoscopy—it is rotated while it is raised from the sleeve down to the sleeve up position, whereas for neutralization retinoscopy, it is left in the sleeve down position and swept from side to side across the pupil. Third, no lenses are used during initial ophthalmoscopic retinoscopy, but they are almost always used during neutralization retinoscopy. Fourth, the end point for ophthalmoscopic retinoscopy is a clear, sharp “ophthalmoscopic” image of the retinoscope streak, whereas for neutralization retinoscopy the end point is the neutralization reflex where the pupil immediately fills with an unfocused image of the streak.

Fig. 6. A. Movement pattern diagram for ophthalmoscopic retinoscopy when rays converge with vergence control up. The approximate net power scale has been calibrated using several streak retinoscopes manufactured by Heine. B. Movement pattern diagram for ophthalmoscopic retinoscopy when rays converge with vergence control down. The approximate net power scale has been calibrated using several Copeland streak retinoscopes.

The basic idea behind ophthalmoscopic retinoscopy is that the retinoscopist can determine when the focal point of the retinoscope falls on the focal point of the patient's eye. When this occurs, the retinoscopist can see the image of the retinoscope streak as a sharply focused line in the patient's pupil. By altering both the distance of the retinoscope to the patient's eye and position of the focal point of the emitted streak from the retinoscope head (which is another way of saying the “vergence” of the emitted streak), the retinoscopist can superimpose the focal point of the retinoscope onto the focal point of the patient.

OPHTHALMOSCOPIC RETINOSCOPY OF SPHERICAL EYES

When performing ophthalmoscopic retinoscopy, the retinoscopist begins with the retinoscope 5 cm (about 2 inches) away from the patient's eye with the sleeve all the way down (Fig. 7). The streak exits the retinoscope head as diverging light that comes to focus at a distance 40 cm behind it (behind the retinoscopist's head) in virtual space. If the patient is a -2.25 D myope, the focal point of the retinoscope lies in the same point in space as the focal point of the patient, and the retinoscopist sees a finely focused streak of light in the patient's pupil. It does not matter that the focal point of the retinoscope is in virtual space; it only matters that the focal point of the retinoscope is coincident with the focal point of the patient. At this point, the patient's and retinoscope's focal points are conjugate. The retinoscopist now rotates the streak 360 degrees by rotating the sleeve in the retinoscope handle. If the streak image is in focus in all meridians, the patient has no astigmatism, and ophthalmoscopic retinoscopy is complete at this stage. However, if the streak is in sharp focus in one orientation, but out of focus in another, the patient has astigmatism. Estimation of the refractive errors of astigmatic individuals is discussed toward the end of this section. For now, let us concentrate on eyes with spherical refractive errors.

Fig. 7. At the very bottom of sleeve adjustment, a bright, thin, focused image will emerge on the retina if the far point of the eye is 40 cm in front of cornea or about 35 cm behind the retinoscope. Raising the sleeve from the bottom moves the virtual focus of the retinoscope closer to the horizon, allowing the detection of lesser amounts of myopia until the middle the retinoscope, where plano is detected. The distance that the sleeve is adjusted is a measure of the refractive distance between plano and -2.25 D.

Emmetropia and Mild Ametropia

If the patient's refractive error is anything other than -2.50 D, the image of the streak in his pupil as seen by the retinoscopist will be out of focus—the farther the patient is from -2.50 D, the more out of focus the image will be. At this point, the retinoscopist slowly raises the retinoscope sleeve while rotating the streak 360 degrees (a technique known as “spiraling”). She keeps the retinoscope head 5 cm from the patient's eye throughout this step. As the sleeve is raised the first one third of its range, the focal point of the retinoscope moves farther and farther from the back of the retinoscopist's head until it lies on the horizon when the sleeve is approaching one third of the way up. If the image of the streak is in focus at this point, the patient's focal point must lie at infinity, and he must therefore be emmetropic (Fig. 8). All patients with refractive errors between emmetropia and 2.25 D of myopia should be discovered up to this point with the sleeve between all the way down and one third of the way up, with the retinoscope positioned 5 cm from the patient.

Fig. 8. Locating the far point of a plano eye in ophthalmoscopic retinoscopy when the retinoscope is 5 cm from the subject's eye. Move the sleeve toward the middle position corresponding to the approximate or calibrated position so that the retinoscopic rays emerge in a parallel bundle and create a bright, thin, focused image on the retina. This position can be used to confirm emmetropia after refractive correction or to confirm the absence of a significant refractive error in an uncooperative subject. The far point found corresponds to infinity. In practice, this step is combined with the steps for estimating any refractive error between -2.25 and + 4.00 D.

The retinoscopist can easily learn to calibrate the sleeve position for the vergence and refraction at the 5-cm distance and depend on proprioception and a memorized calibration scale for this information. The mechanics of most retinoscopes make it difficult to permanently display this information on the handle. Fortunately, it is possible to place a written calibration on the handle of the Heine ophthalmoscope so that the 5-cm ophthalmic retinoscopy can be read with precision (see Fig. 5). The text in the preceding section explains how to calibrate any retinoscope, and the exercise can help you understand the optics.

If the retinoscopist gets much above the midsleeve position with the streak not yet coming into focus, she continues to spiral the sleeve up. She is now in the area where the image of the streak of patients with low hyperopic refractive errors will appear in focus. This occurs because the streak is emitted in a converging nature when the sleeve is raised above the one-third mark. The focal point of the streak is now located in space behind the patient's head. When the sleeve is just barely above one third of the way up, the focal point of the streak is far behind the patient's head, near the horizon, and will be conjugate with the patient's focal point only if he is a weak hyperope (Fig. 9). As the sleeve is raised farther, the focal point of the retinoscope moves closer to the back of the patient's head. When the sleeve is raised all the way up, the focal point of the retinoscope lies 33 cm in front of it—roughly 25 cm behind the patient's cornea. The focal point of the retinoscope will be conjugate with the focal point of the patient if he is a + 4 hyperope. All hyperopes with refractive errors lower than + 4 should be discovered in this way with the sleeve between one third and all the way up and the retinoscope positioned 5 cm from the patient. Thus, the retinoscopist can estimate or confirm the refraction of all patients between -2.25 and + 4 by merely spiraling the sleeve upward while holding the retinoscope 5 cm from the patient's eye (Fig. 10).

Fig. 9. Locating the far point of a + 4.00-D eye in ophthalmoscopic retinoscopy when the retinoscope is 5 cm from the subject's eye. Start with the sleeve all the way down and move slowly toward the top. At or within 1 mm or so of the top, a bright, thin, focused image will emerge on the retina if the far point of the eye is 40 cm behind the cornea. Lowering the sleeve permits you to detect lesser amounts of hyperopia by moving the virtual focus of the retinoscope from about 25 cm behind the eye further toward the horizon, allowing the detection of lesser amounts of hyperopia until midsleeve, where the retinoscope detects plano. The distance that the sleeve is lowered is a measure of the refractive distance between + 4.00 D and plano.

Fig. 10. Ophthalmoscopic retinoscopy: summary of techniques for locating the far points of eyes with refractive errors between -2.25 and + 4.00 D when the retinoscope is 5 cm from the subject's eye.

HIGH HYPEROPIA AND HIGH MYOPIA

If the retinoscopist began with the sleeve dropped all the way down and has raised it all the way up, and still has not seen a clear, sharp image of the retinoscopy streak in the patient's pupil, she now starts to slowly move the retinoscope away from the patient. The purpose of this step is to estimate eyes whose far points are less than 25 cm behind the cornea (higher hyperopes) or less than 66 cm in front of the cornea (higher myopes) (Fig. 11). She leaves the retinoscope sleeve all the way up for this maneuver but continues to rotate the streak 360 degrees. Remember, with the retinoscope sleeve all the way up and the retinoscope located 5 cm in front of the patient, the focal point of the retinoscope is located 25 cm behind the patient's eye. As the retinoscopist slowly moves away from the patient, the focal point of the retinoscope moves closer and closer to the patient's eye from behind. It is in this range that the focal points of higher hyperopes become conjugate with the focal point of the retinoscope. For example, a 10.00-D hyperope will have a far point 10 cm behind the patient's eye; to be in conjugate focus at this point, the retinoscope is located 33 - 10 = 23 cm in front of the patient's cornea.

Fig. 11. Locating the far point of a -4.00-D eye using ophthalmoscopic retinoscopy. The vergence control is adjusted (all the way up) for the maximum concave mirror effect, causing the retinoscope filament image to form about 33 cm in front of the handle. The retinoscope is placed so that the examiner sees in the patient's pupil a bright, sharply focused retinal image through the aperture. This occurs when the far point of the eye is at the same point as the image of the retinoscope. The eye shown is 4.00 D myopic and has its far point 25 cm anterior to the cornea. The far point of the eye is conjugate with the retina. (Weinstock SM, Wirtschafter JD: A Decision-Oriented Manual of Retinoscopy. Springfield, IL: Charles C Thomas, 1976.)

When the retinoscope is exactly 33 cm away from the patient's eye and the sleeve is all the way up, the streak image will be in focus on the patient's iris and eyelids. We call this point the intercept point, and it serves as an important landmark. If the image of the streak is in sharp focus just inside of this landmark, the patient's focal point must lie just behind the retina, and he must be a high hyperope (Fig. 12). In contrast, if the image of the streak is in sharp focus just outside of the intercept point, the patient's focal point must lie just in front of the retina, and he must be a high myope. Thus, a mere 10 cm (5 cm on either side of the intercept) separates where the focal points can be found for a -20.00-D myope and a + 20.00-D hyperope (Fig. 13). Fortunately, the intercept point is a clear landmark to keep the retinoscopist from losing her way. Importantly, no patient can have a refractive error such that the streak image is in focus at the intercept point.

Fig. 12. Locating the far points of eyes between + 4.00 D and higher using ophthalmoscopic retinoscopy. A. The retinoscopist begins at + 4.00 D, with the sleeve all of the way up and positioned 5 cm from the subject's eye. If a sharply focused filament image on the retina is not seen, the retinoscopist then recedes until it is seen or until the retinoscope filament is in sharp focus on the cornea and eyelids. This point is called the intercept. B. If at any point the retina is in sharp focus, the far point has been located; this point is behind the cornea and approximately 33 cm in front of the retinoscope, where the rays converge in virtual space. To determine the approximate amount of hyperopia, one can estimate the distance from the cornea or from the intercept (whichever is easier). The intercept occurs at 33 cm from the cornea. The reciprocal of the distance in meters gives the power in diopters. For example, if the retinal image is in sharp focus at 28 cm from the eye and 5 cm toward the eye from the intercept, the reciprocal of 0.05 is + 20.0 D.

Fig. 13. Locating the far points of eyes between high myopia and -3.00 D using ophthalmoscopic retinoscopy. The retinoscopist begins with the sleeve all of the way up and positioned at the intercept 33 cm from the subject's eye. In practice, this step is done as a continuation of seeking high hyperopia, as described in Fig. 12. At the intercept, the retinoscope filament is in sharp focus on the cornea and eyelids. If a sharply focused filament image on the retina is not seen, the retinoscopist then recedes until it is seen or until the retinoscopist has receded to the working distance of 66 cm. If at any point the retina is in sharp focus, the far point has been located; this point is in front of the cornea and approximately 33 cm in front of the retinoscope, where the rays converge in real space. To determine the approximate amount of myopia one, can estimate the distance from the cornea or from the intercept (whichever is easier). The intercept occurs at 33 cm from the cornea. The reciprocal of the distance in meters gives the power in diopters. A. For example, if the retinal image is in sharp focus with the retinoscope at 33 cm from the eye and 5 cm further from the eye than the intercept, the reciprocal of 0.05 is -20.00 D. B. Similar example for -3.00 D. The retinoscope is located at 66 cm.

A sometimes useful and interesting phenomenon occurs when the converged beam is focused close to the plane of the cornea and lens of the subject's eye; it is a diffuse red reflex that may retroilluminate anterior segment opacification. The red reflex when the intercept is focused on lens of the eye is called the “incidence neutral” point in retinoscopy.11

If the retinoscopist has gone this far in the process of ophthalmoscopic retinoscopy and the image of the retinoscope streak has not yet come into focus, she merely continues to move farther from the patient. In this way, she moves the focal point of the retinoscope through the range where the focal points of the high and mid-range myopes lie. Eventually, she will pull the retinoscope back to the point where it is 66 cm away from the patient's eye. Here, with the retinoscope sleeve all the way up, the focal point of the retinoscope lies 33 cm in front of it and 33 cm in front of the patient. Therefore, at arm's length, the focal point of the retinoscope is conjugate with the focal point of the patient if he is a -3 myope.

Through ophthalmoscopic retinoscopy, all ranges of myopia and hyperopia can be deduced unless the patient's refractive error lies between -2.25 and -3.00 D. The focal points of these moderately myopic patients fall outside of the range accessible to the streak retinoscope using ophthalmoscopic retinoscopy without a trial lens.

Ophthalmoscopic Retinoscopy of Highly Ametropic Eyes

Ophthalmoscopic retinoscopy reveals a focused streak image very near the intercept point in all high myopes and high hyperopes. The conjugate point for high hyperopes lies just inside of the intercept point and for high myopes lies just beyond it. Certain techniques exist to help fine-tune the end point.

When the ophthalmoscopic retinoscopy end point lies near the intercept point, the retinoscopist can return the retinoscope to the point in space where the intercept point is seen. She can then keep her free hand at this point in space and move the retinoscope in (for hyperopes) or out (for myopes) until the end point is seen. She then merely needs to measure the distance between the retinoscope and her free hand and convert that distance to diopters. If she had to move the retinoscope forward 10 cm, she knows that the patient is a + 10.00-D hyperope; if she had to move the retinoscope backward 5 cm, she knows that the patient is a -20.00-D myope.

Although ophthalmoscopic retinoscopy is typically performed without lenses, loose lenses can also be used to help refine the estimated end point of a patient with a high degree of ametropia. For example, take the situation where the image of the streak is in sharp focus when the retinoscope is held 36 cm away from the patient's eye. This is the range at which focal points can be found for high myopes; however, the distance separating the focal points for all those between -8 and -20.00 D is fairly small. In fact, focal points for this range of myopia span an area only 7.5 cm wide. In this situation, it is helpful to put up a -10.00-D lens and repeat all the steps of ophthalmoscopic retinoscopy. Now, suddenly, the -8.00-D patient will behave much differently than a -14.00-D patient: the -8.00-D patient will appear like a + 2.00-D hyperope, and the -14.00-D patient will appear like a -4.00-D myope. In this way, a much truer estimation of the patient's refractive error can be made. This same technique, of course, works equally well for high hyperopes and aphakic individuals. The only difference is that the retinoscopist holds a + 10.00-D lens rather than a -10.00-D lens.

OPHTHALMOSCOPIC RETINOSCOPY OF ASTIGMATIC EYES

Detection

The previous discussion describes the technique for ophthalmoscopic retinoscopy of patients with spherical refractive errors. When estimating astigmatic individuals, an extra step must be taken. Unlike someone with a spherical refractive error who focuses light to a point a single discreet distance from his pupil, a patient with regular astigmatism focuses light to two points (actually lines), located two discreet distances from his pupil. Through this technique of ophthalmoscopic retinoscopy, it is easy for the retinoscopist to find these two focal distances.

The key to discovering astigmatism by ophthalmoscopic retinoscopy is that the retinoscopist constantly rotates the streak by rotating the sleeve in the retinoscope handle. During the first stage of ophthalmoscopic retinoscopy, while the sleeve is being raised, it is also being rotated—the two motions combined result in spiraling. During the later stages of ophthalmoscopic retinoscopy, while the sleeve is kept in the “sleeve up” position, it is rotated while the retinoscopist moves the retinoscope from 5 to 66 cm away from the patient's eye.

For a patient with astigmatism, ophthalmoscopic retinoscopy is begun just as it is with a patient with a spherical refractive error. The retinoscope is placed 5 cm in front of the patient's eye with the sleeve all the way down (Fig. 14). The retinoscopist then rotates the streak without raising the retinoscope sleeve. Any irregularity in the width of the reflex indicates regular or irregular astigmatism. This step is referred to as Step 1 of ophthalmoscopic retinoscopy because it is such a helpful first step. Everything else that had been discussed in the previous section is referred to as Step 2 and is shown in a flowchart (Fig. 15). The retinoscopist slowly spirals the sleeve up while evaluating the appearance of the image of the streak in the patient's pupil. At some point, the image of the streak should be in sharp focus. Without lowering or raising the sleeve, the retinoscopist rotates it 360 degrees. If the image of the streak stays in sharp focus, that patient does not have astigmatism; the retinoscopist makes note of the sleeve position and distance from the patient, and ophthalmoscopic retinoscopy is complete. If, however, the image of the streak goes out of focus while the sleeve height is kept constant and the streak is rotated, the retinoscopist knows that the patient has astigmatism. She has estimated the power in one meridian (where the streak is in focus), and now merely needs to determine the power in the other.

Fig. 14. Detection of stigmatism, step 1: how to check for irregular astigmatism and myopic astigmatism before beginning the refraction-estimating step 2 that constitutes the essence of ophthalmoscopic retinoscopy.

Fig. 15. Ophthalmoscopic retinoscopy flowchart, step 2: how to estimate all refractive errors except those between -2.25 and -3.00 D using a retinoscope that converges with vergence control up. The purpose of this step is to prepare for neutralization retinoscopy. (Redrawn from Weinstock SM, Wirtschafter JD: A Decision-Oriented Manual of Retinoscopy. Springfield, IL: Charles C Thomas, 1976.)

Quantitative Estimation

At this point, the retinoscopist makes a note of the sleeve position and retinoscope distance where the first meridian has been found, and proceeds with ophthalmoscopic retinoscopy by continuing to raise the sleeve up (if it has not already reached the top) or moving the retinoscope farther from the patient's eye (if it has). The streak does not need to be spiraled or rotated at this point because the retinoscopist knows the axis of the second meridian—it must lie 90 degrees from the first one. At some point, she will come to the position where the second focal point lies, and the image of the streak will again come into sharp focus in the patient's pupil.

Occasionally, when performing ophthalmoscopic retinoscopy, the retinoscopist finds the focal point for one meridian of a patient's astigmatism, but as she continues on with ophthalmoscopic retinoscopy, she never finds the second meridian. There are a few reasons why this might occur. First, the patient may have irregular astigmatism so that the focal point of a second meridian is difficult to recognize. Second, the power of the second meridian may lie between -2.00 and -3.00 D—the refractive zone where ophthalmoscopic retinoscopy cannot result in a sharp image. However, the most common reason why the retinoscopist may find only one meridian of a patient's astigmatism is that she merely did not recognize the first one when she came upon it. When she comes upon the second meridian, she mistakes it for the first one, and continues on. As she continues with ophthalmoscopic retinoscopy, of course, no second focal point will be found. What she must do once this error is recognized is go back to the position that she was in when she discovered the one meridian she did find, and then proceed with ophthalmoscopic retinoscopy backward until she comes upon the focal point of the other one (the true first meridian).

Once the focal points are found for the two principal meridians, the estimation of the patient's refractive state can be calculated. The second meridian found is the axis of the plus power (assuming the two meridians were found in the correct order, of course). For example, say we are examining a patient and find the streak in focus in the vertical meridian when we are 5 cm from the patient with the sleeve all the way up. However, the streak goes out of focus when we rotate it to the horizontal meridian. We know that the power is + 4 with axis 90 degrees. We make a note of this and continue on. We find the image of the streak in focus in the horizontal position when the retinoscope is located 15 cm from the patient, and the sleeve is up. From this, we know that the power is + 6 with axis 180 degrees. We then convert to a plus cylinder formula which is + 4 + 2 × 180 or to a minus cylinder formula of + 6 - 2 × 90 degrees.

Ophthalmoscopic retinoscopy allows the instantaneous confirmation of prescribed spectacles as leaving the patient corrected to emmetropia. Simply set the sleeve at plano and rotate it while at a distance of 5 cm from the patient's eyes. If the patient is not accommodating, the retinoscopist will see a sharply focused image in all meridians.

Back to Top
NEUTRALIZATION RETINOSCOPY
Most clinicians use the retinoscope solely to perform the technique of “neutralization.” As discussed previously, it is unfortunate that the retinoscope is not often used to its fullest potential. However, many clinicians believe that they get enough information from this one technique that they do not feel the need to become skilled in the others. In truth, they cannot be faulted too harshly because neutralization alone can provide the skilled retinoscopist with a great deal of information about a patient's refractive status. This is particularly true because most patients are either near plano or present themselves to the examiner with an almost correct prescription in their 
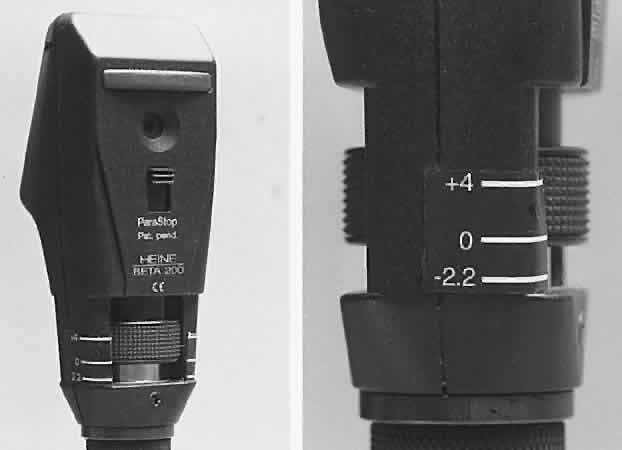
present spectacles.

Neutralization is performed with the retinoscope held at a constant predetermined distance from the patient with the sleeve all the way down (light emitted in a diverging manner). The retinoscopist makes decisions about the patient's refractive error based on the appearance of the retinoscope reflex after it is reflected off the patient's fundus and back through the pupil (Fig. 16). What the retinoscopist sees is not the image “on the retina” (which is what she sees when performing ophthalmoscopic retinoscopy), but rather the magnified image “of the retina.” Therefore, discussion about neutralization retinoscopy must begin with discussion about the retinoscopic reflex at neutralization.

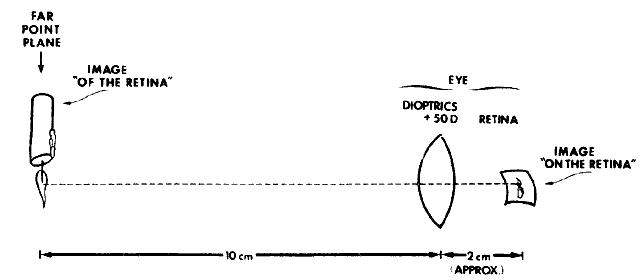
Fig. 16. A method of estimating the magnification of image “of the retina” as compared with image “on the retina.” Eye has 10.00 D of myopia. Magnification = Image of/Image on = 10/2 = 5. (Safir A: Retinoscopy. In Tasman W, Jaeger EA [eds]: Duane's Clinical Ophthalmology. Philadelphia: JB Lippincott, 1982.)

THE NEUTRALIZATION REFLEX

When performing neutralization retinoscopy, the retinoscopist shines diverging light through the patient's pupil from a standard working distance (usually 66 cm). This light is reflected off the patient's fundus, and in this way, the fundus acts as a new point source of light. This is called the illuminating system. The light that originates from the luminous retina then passes through the patient's vitreous, lens, pupil, aqueous, and cornea, until it finally exits the patient's eye on its way back to the retinoscope. This is called the viewing system. The retinoscopist must be able to differentiate between the illuminating and viewing systems because different techniques of retinoscopy can depend on varying the components of one but not the other. For example, ophthalmoscopic retinoscopy, as described previously, allows the user to vary different aspects of the illuminating system while keeping the viewing system constant. Neutralization retinoscopy, conversely, varies the viewing system while keeping the illumination system constant.

When diverging light is shone onto an emmetrope's retina, the retina becomes luminous and acts as a point source of light. The rays of light then escape his eye in a parallel fashion. If this concept is not intuitive, merely follow the standard light ray diagram backward. In similar fashion, light starting as a point on a myope's luminous retina is emitted as converging light, where more myopic individuals emit more highly converging light than less myopic ones. Similarly, light starting as a point on a hyperope's luminous retina is emitted as diverging light, and hyperopic patients emit more diverging light than less hyperopic ones. The vergence of the rays emitted from the eye 
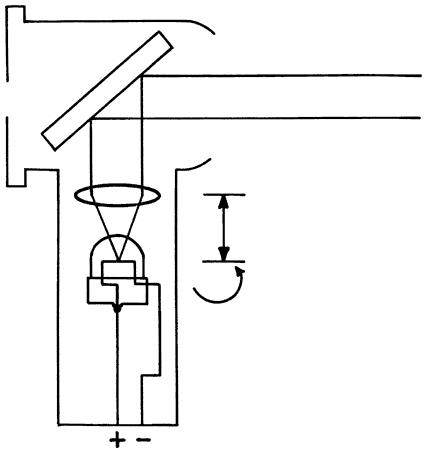
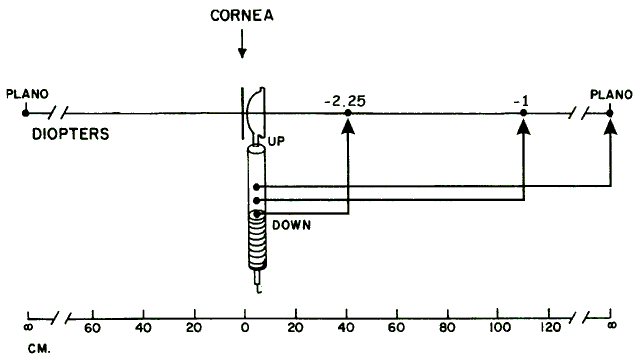
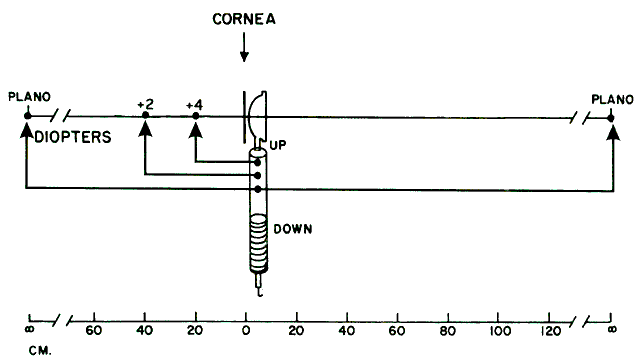
determines the qualities of the reflex seen by the retinoscopist. A neutralization reflex occurs under the circumstance when the far point of the eye correlates with the location of the peephole of the retinoscope (Fig. 17).

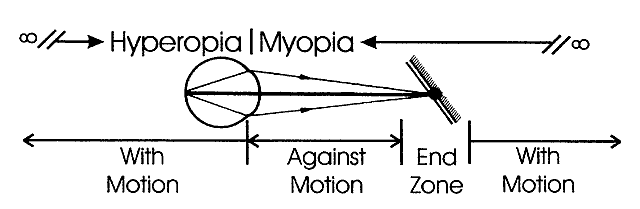
Fig. 17. The optical basis for neutralization retinoscopy. The location of far points produces the “with” and “against” motions for a retinoscope with a divergent beam when performing neutralization retinoscopy. “With” motion is seen under all circumstances except when the far point of the eye-corrective lens system is situated between the cornea and the peephole of the retinoscope. The far point of the illustrated eye is at the peephole and is thus neutralized.

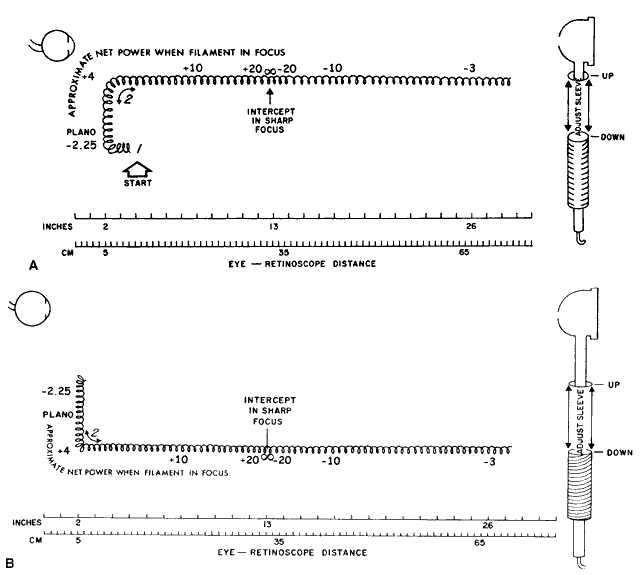
If a retinoscopist were to examine an emmetropic eye at infinity, she could make assumptions on the diverging, converging, or parallel nature of the reflected light by sweeping the retinoscope streak back and forth across the patient's pupil. However, it is not possible to perform retinoscopy from an infinite distance; it is customary to adapt a working distance of 66 cm, corresponding to + 1.50 D. By introducing + 1.5 lens in front of the subject's eye, the far point of a plano prescription is relocated to 66 cm (correcting the final prescription for the working distance lens is described subsequently). In this circumstance, what the retinoscopist is truly evaluating is whether the retinoscope lies between the patient's eye and far point, lies at the far point, or lies beyond it. If the patient is an emmetrope, the far point lies on the horizon, and therefore the retinoscope always must lie between the patient's eye and far point. If the patient is a hyperope, the far point actually lies beyond the horizon, and the retinoscope also lies between the patient's eye and far point. Things are more interesting, however, when evaluating myopes in this way. Light is emitted from a myope in a converging manner so that the far point is somewhere in real space in front of the myope's eye. It is possible for the retinoscope to be placed between the patient and far point, exactly on the far point, or out beyond the far point. This relationship depends, of course, on both the location of the retinoscope, and the level of myopia (which determines the location of the far point).

If the retinoscope is placed between the eye and far point (as it is for all emmetropes and hyperopes, and some myopes) and turned so that the emitted streak is swept from side to side across the patient's pupil, the light reflex seen inside the pupil appears to sweep in the same direction as the light emitted from the retinoscope (seen on the patient's iris, lids, brow, and cheek). This motion is called “with” motion because the light that is afferent to the retinoscope seems to move “with” the light that is efferent from 
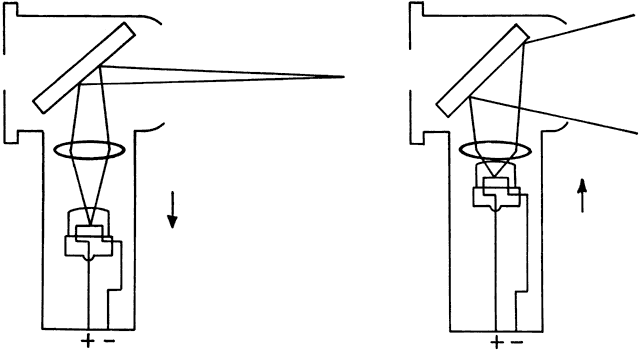
the retinoscope (Fig 18).

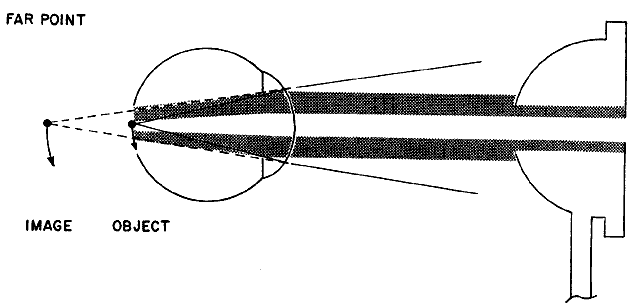
Fig. 18. “With” motion reflex in hyperopia: a “with motion” reflex of light comes into the shadow projected in the optical system from the aperture of the retinoscope or the examiner's pupil. The rays from the filament to the retina are not shown. They form an unfocused horizontal filament image on the retina that acts as a new object with its image behind the retina. When the retinoscope is tilted slightly, the object moves down and the image moves down and into the shadow. This is seen as a “with motion” reflex. Light rays from the image move up on the examiner's retina. (Weinstock SM, Wirtschafter JD: A Decision-Oriented Manual of Retinoscopy. Springfield, IL: Charles C. Thomas, 1976.)

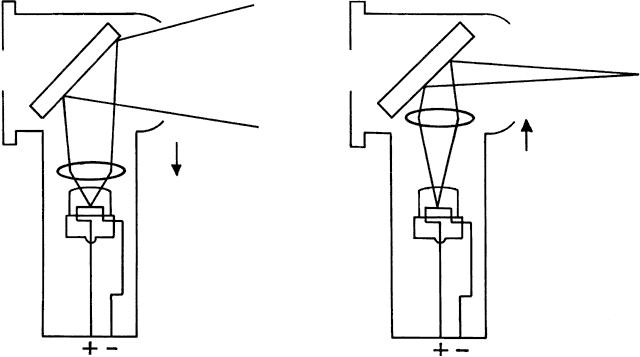
If the retinoscope is placed beyond the patient's far point and swept from side to side across the pupil, the light reflex seen inside the pupil appears to sweep in the opposite direction as the streak emitted from the retinoscope (Fig. 19). This motion is called “against” motion because the light emitted from the eye appears to move “against” the light that is emitted directly from the retinoscope.

Fig. 19. Origin of the “against” movement. (Safir A: Retinoscopy. In Tasman W, Jaeger EA [eds]: Duane's Clinical Ophthalmology. Philadelphia: JB Lippincott, 1982.)

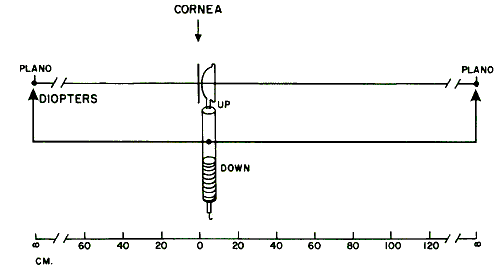
When the retinoscope is placed exactly on the patient's far point, neither “with” nor “against” motion is seen. At this point, all the light emitted from the patient's eye enters the retinoscopist's eye simultaneously. At exact neutrality, in a spherical eye with a small pupil, the retinoscopist may see no motion at all; rather, the patient's pupil seems to suddenly fill with light as the streak moves across it. This “on-off” phenomenon is important to recognize because it serves as the end point when performing the technique of neutralization.

In addition to its direction of movement, other qualities of the reflected retinoscope streak can be evaluated. These qualities all give the retinoscopist clues as to how close to the far point the retinoscope is being held. The three most important qualities of the reflex are the speed at which it moves, its brightness, and its width. If one thinks of the reflex at the neutralization point as infinitely fast (so fast that it immediately fills the pupil without apparent motion), infinitely bright, and infinitely wide, it is easy to understand what the reflex should look like when the retinoscope is either near to, or far from, the neutralization point (Fig. 20). When the retinoscope is held near the patient's far point, the reflex should appear fairly fast, bright, and wide. As the retinoscope is moved farther from the far point, the reflex appears to move slower and is dimmer and thinner. The retinoscope can eventually be moved so far from the patient's far point that the reflex is slow, thin, and dim enough that it is quite difficult to recognize as a reflex at all.

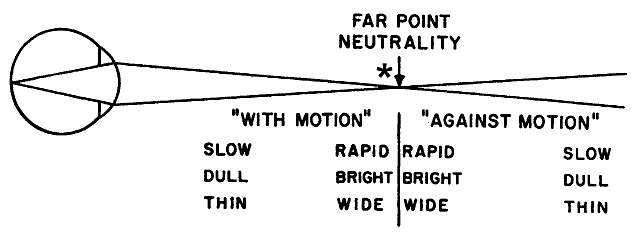
Fig. 20. Neutralization retinoscopy: diagram of changes in characteristics of reflex as in the zone surrounding the point of neutrality. At neutrality, the reflex motion may be so fast that it cannot be detected. The end point or end zone should be approached from the “with” reflex side and the judgment of neutrality made erring toward the “with” reflex rather than the “against” reflex. *The point within the neutralization zone where neutralization is best observed. (After Weinstock SM, Wirtschafter JD: A Decision-Oriented Manual of Retinoscopy. Springfield, IL: Charles C Thomas, 1976.)

Optics of the Neutralization Reflex

Five features characterize the neutralization end point, the point at which neither a “with” nor “against” reflex can be identified. Three of these are considered to define the end point, but two others can also be observed. The three standard characteristics are increases in speed, brightness, and width of the moving image. To these can be added , the “on-off phenomenon” (the intermittent disappearance of the observed reflex) and the scissors reflex.

  1. Speed of the “with” or “against” motion: If the retinoscope mirror is tilted in a highly ametropic eye, the resultant reflex is imaged at a far point that is much closer to the eye than the reflex of an almost emmetropic eye, the far point of which is located at a much greater distance. With regard to the subject's pupil, movement of the image at the far point of the almost emmetropic eye will seem to have a greater angular velocity or speed. It should be stressed that the direction of movement of the fundus image is not influenced by the patient's ametropia (a downward movement of the mirror will always produce a downward movement of the light on the fundus). The “with” or “against” movement is a function of the observation system, thus an “against” movement occurs only when the eye and external lens system have a far point between the patient's eye and the retinoscope peephole.
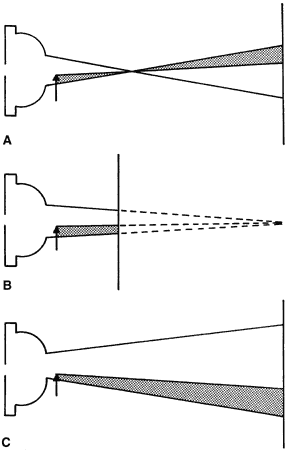
  2. Brightness of the image: As neutrality is approached, all of the rays emerging from the eye are focused at the peephole, where they provide the brightest image that the examiner observes. Illumination increases inversely to the square of image size. At any other focal distance, some or all of the rays of light will not reach the peephole and the image becomes duller (Fig. 21).
  3. Width: Safir1 has noted that the power of retinoscopy results from the image of the retina being projected in space with large magnification. As neutrality is approached, the retinoscopic reflex appears widest. The apparent width of the moving retinoscopic image is the most difficult of the concepts to comprehend because it relates to the concentration of light emerging from the retina through the patient's pupil and then through the peephole of the retinoscope. Michaels2 has discussed this subject in detail.
  4. The on-off phenomenon: Although the retinoscopic reflex is bright and wide on either side of neutrality, the reflex may disappear completely when the retinoscope peephole is exactly conjugate to the eye-corrective lens system (see Fig. 21). Fortunately, neither the patient's eye nor the examiner's eye and hand can maintain this exact position for long, but astute retinoscopist's may notice the on-off phenomenon at neutrality.
  5. The scissors reflex: The refractive elements of the eye are not perfectly spherical. Thus, the center of the optical path may be slightly myopic when compared with that of the periphery. The amount of aberration may be small, but under circumstances of perfect neutralization and a widely dilated pupil, the center of the optical path may return a “with” motion while the periphery returns an “against” motion. This pattern of opposing central and peripheral retinoscopic movements is known as a scissors reflex. There is only a small dioptric distance over which the scissors reflex can be detected. The entire reflex returns to all “with” or all “against” motion within about 0.50 D on either side of neutralization.

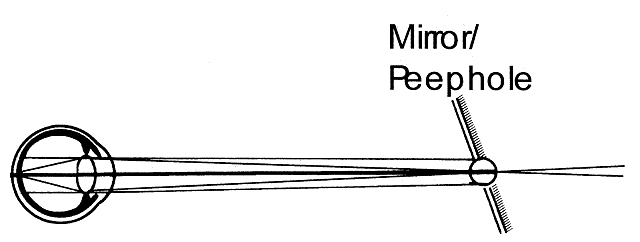
Fig. 21. The origin of the on-off phenomenon at neutrality. The far point of the eye is situated at the peephole of the retinoscope. Either all or none of the rays will pass through the peephole with the slightest shift in the subject's eye or the retinoscope or the retinoscopist's eye, causing the retinoscopist to see the contents of the pupil as either filled with light or black.

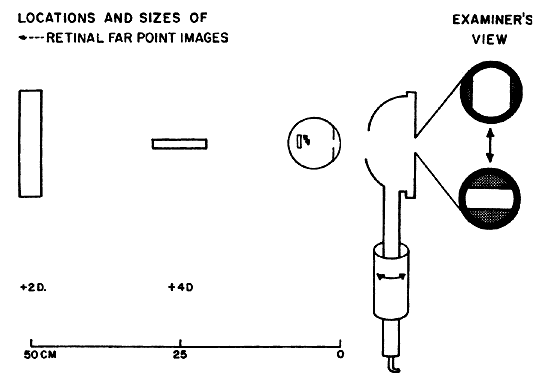
Estimating Low Myopes via Neutralization Without Lenses

By now the reader should have determined that it is in fact quite possible to neutralize low myopes without the use of lenses. The trick is to place the retinoscope directly on the patient's far point, sweep the retinoscope streak across the patient's pupil with the sleeve down, recognize the “on-off” phenomenon of the neutralization reflex, measure the distance from the patient's eye to the retinoscope in meters, take the reciprocal—thus converting from meters (distance) to diopters (vergence)—and voilà, the patient's refractive error has been determined.

For example, neutralization for a -2.00-D myope can be seen by placing the retinoscope 50 cm from the patient's eye, and for a -4.00-D myope by placing the retinoscope 25 cm from this patient's eye. Neutralization for an emmetrope can only be done in this fashion by placing the retinoscope infinitely far from the patient's eye—theoretically possible, but not practically feasible. Because the far points of hyperopes do not lie in real space (they lie beyond infinity), hyperopes cannot be neutralized in this way.

The patients who are best served by this estimation technique of neutralization retinoscopy are those whose net refractive errors lie between -1.50 and -3.00 D, and conveniently this is exactly the group that lies outside the range of estimation possible with ophthalmoscopic retinoscopy.

NEUTRALIZATION RETINOSCOPY OF SPHERICAL EYES

The aforementioned technique describes a way to estimate a low myope's refractive error without the use of lenses. The key to this method is that the retinoscopist must change the distance that the retinoscope is held from the patient's eye when trying to find the far point. When performing neutralization retinoscopy, she does exactly the opposite—she holds the retinoscope at a constant specific working distance and uses lenses to bring the patient's far point to the retinoscope.

The first thing that a retinoscopist must do is choose a comfortable working distance. She wants to be as far from her patient as possible while still being close enough to comfortably manipulate lenses in front of his eye. Thus, the working distance usually is described as “arms length” away from the patient. For the average retinoscopist, this distance works out to about 66 cm. Taller retinoscopists may prefer 75 cm, whereas shorter ones may use 50 cm. It is not uncommon for retinoscopists to work closer than their usual working distance in difficult cases, such as small children, or adults with cataracts or small pupils. The actual working distance does not matter as long the retinoscopist is aware of the distance and adjusts her calculations accordingly.

The retinoscopist should be able to sit at her comfortable working distance while using lenses to bring the patient's far point to her. The retinoscopist accomplishes this feat by sweeping the retinoscope streak across the patient's pupil and evaluating the direction, speed, brightness, and width of the retinoscopy reflex. If she observes “against” motion, the retinoscope must lie beyond the patient's far point, and the retinoscopist can move the far point toward the retinoscope by placing a minus lens in front of her patient's eye. If the reflex is fast, bright, and wide, the retinoscope must have been near to the patient's far point, and a weak minus lens should be chosen. However, if the reflex is slow, dim, and narrow, the retinoscope probably lies a greater distance from the far point, and a stronger minus lens should be chosen. If “with” motion is observed after a minus lens is placed before the patient's eye, the patient's far point has been moved beyond the retinoscope because too strong of a minus lens was chosen. This lens should be removed and replaced with a weaker minus one.

Similar manipulations are performed if “with” motion is initially seen when neutralization is begun. In such cases, the far point must lie beyond the retinoscopist's comfortable working distance. Again, how far away the far point lies can be estimated by judging the quality of the reflex. A plus lens then is chosen to bring the far point forward toward the retinoscope.

Whenever possible, the retinoscopist should try to manipulate the far point in such a way that “with” motion is being observed. A “with” reflex typically is sharper and easier to judge than an “against” reflex. Thus, if “against” motion is seen, neutralization will be easier to perform if a strong enough minus lens is placed to push the far point beyond the retinoscope, so that the retinoscopist can observe “with” motion. Care must always be taken, however, when putting minus lenses in front of younger patients because they can easily “eat up” this minus by accommodating, thus leading the less careful retinoscopist down the wrong path.

It should also be noted that the neutralization end point is not exactly an end point—rather it is an end zone that measures about half a diopter in depth (see Fig. 20). The true size of this “zone of doubt” varies with pupil size and working distance—it is narrowest with a small pupil and close working distance. Best results are achieved when entering the zone of doubt from the plus side, by watching the “with” motion reflex get faster, brighter, and wider until the retinoscopist is convinced the neutralization reflex has been achieved. If the zone of doubt is entered from the minus side (through “against” motion), there is a greater chance for error.

Eventually, after just a few different lenses are placed before the patient's eye, the retinoscopist can observe the neutralization reflex. At this point the goal is achieved, and the retinoscopist has managed to bring the patient's far point to the retinoscope (which is being held at the working distance). The retinoscopist is now ready to write a spectacle correction. However, the lenses currently in front of the patient's eye do not represent the correction needed to see clearly at infinite distance; rather, the lenses represent the correction needed to see clearly at 66 cm. The patient will be quite dissatisfied if given a prescription for a pair of glasses that allows for clear vision only 66 cm away or closer.

CORRECTING THE PRESCRIPTION FOR THE WORKING DISTANCE LENS

The retinoscopist must always remember to modify the prescription for distance vision, a mathematical manipulation called correcting for the working distance. The gross power is that which the retinoscopist is holding when retinoscopy is completed. This corresponds to the power that brings light from the patient's luminous retina to focus at the working distance. The net power is that which neutralizes the patient's refractive error for good distance vision—the power that focuses light from the luminous retina to a point at the horizon. The mathematical computation is simple. The retinoscopist merely subtracts the working distance (in diopters) from the gross to get the net. For example, when the working distance is 66 cm (+ 1.50 D) and the patient is neutralized with a -2.5 lens, the gross minus the working distance equals the net, or: -2.5 - (+ 1.5) = -4. The retinoscopist will give a prescription for a -4 lens.

NEUTRALIZATION RETINOSCOPY OF ASTIGMATIC EYES

The previous discussion describes neutralization of spherical patients. Further steps need to be taken in a patient with astigmatism. In patients with astigmatism, the retinoscopy reflex seen in the pupil has one more quality in addition to speed, brightness, and width. The reflex in patients with astigmatism also appears to “break” as the light filament is rotated (Fig. 22). The retinoscope reflex seen in the patient's pupil will not be continuous with the streak lying on the cornea, lids, forehead, and cheek; it will appear broken. There will be, however, two meridians where the retinoscope reflex will be continuous with the streak—where it will not appear broken. These meridians correspond to the two axes of the patient's astigmatism. The retinoscopist merely needs to neutralize these two meridians separately and combine them to come up with the desired spectacle correction. This can be done using only spherical lenses (as is best when neutralizing children with loose lenses), spherical and plus cylindrical lenses (using a plus cylinder phoropter or loose lenses and trial frames), or spherical and minus cylindrical lenses (using a minus cylinder phoropter or loose lenses and trial frames). Let us further explore the methods of neutralizing astigmatic individuals in whom the less plus (or more minus) axis is neutralized first and the more plus (or less minus) axis is neutralized second. When neutralizing the axes in this order, the retinoscopist can use either only spherical lenses, or spherical and plus cylindrical lenses.

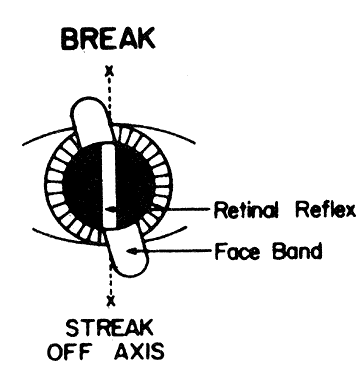
Fig. 22. Break. The line between the streak in the pupil and outside the pupil is broken when the streak is off the correct axis. (Corboy JM: Refining the cylinder. In Corboy JM [ed]: Retinoscopy, p 87. 4th ed. Thorofare, NJ: Slack, 1996.)

Spherical Lens Technique

The first step is for the retinoscopist to find the least plus axis. The retinoscope streak is swept back and forth across the pupil while it is rotated 360 degrees by rotating the light filament in the handle. The retinoscopist then observes at which two meridians the retinoscope reflex does not appear broken—in cases of regular astigmatism, these two meridians should be 90 degrees apart. The retinoscopist then compares the reflex in one meridian to the reflex in the other, noting which meridian's streak exhibits more “against” (slower, thinner, dimmer) or less “with” (faster, broader, brighter) qualities than the other. This meridian is neutralized first. If the reflex in one meridian shows “with” motion and in the other shows “against” motion, the meridian with the reflex that shows “against” is neutralized first.

The more minus meridian of the astigmatic person is then merely neutralized much as the spherical myope or hyperope described previously. The axis of the streak is held along the meridian line and swept in a direction perpendicular to it (i.e., if the 90-degree axis is being neutralized, the streak is oriented straight up and down and swept from side to side). At first, it is not intuitive that the streak be held in the same orientation as the axis meridian because one is searching for the power of the astigmatism, and the power lies not along the axis, but perpendicular to it. Here the retinoscopist must remember that the power is found not by holding the streak still, but rather by sweeping it across the pupil. Another way of saying this is that for each meridian to be neutralized, the axis lies in the orientation of the streak, and the power lies in the direction of the sweep.

Once the proper lens is placed before the patient's eye so that the neutralization reflex is observed for that meridian, the retinoscopist merely subtracts the working distance and records the power needed to correct the patient for that particular axis. She then addresses the other meridian.

The retinoscope streak is rotated 90 degrees, and the reflex is re-examined. The reflex should not appear broken in the new meridian—a broken reflex signifies that either the retinoscope streak is not exactly aligned along the patient's second axis or that the patient has irregular astigmatism. If the reflex is not broken, it is neutralized with lenses. If spherical lenses are to be used, the second meridian is neutralized in exactly the same manner as the first. Once the neutralization reflex has been found, the retinoscopist again subtracts the working distance and records the lens power needed to correct the patient for that particular axis. A simple conversion then needs to be performed before presenting the patient with the proper spectacle prescription, as follows:

  Q: A patient is neutralized with the following lenses at a working distance of 66 cm: [+ 3.50 axis 90] and [+ 4.25 axis 180]. What is the eyeglasses prescription?
  A: Step 1: Subtract the working distance. In this case, the working distance is 66 cm, which is equal to 1.50 D:
[+ 3.50 axis 90] - 1.50 = + 2.00 axis 90 [+ 4.25 axis 180] - 1.50 = + 2.75 axis 180
  Step 2: Transpose from cross-cylinder notation to plus-cylinder notation:
+ 2.00 sphere + ([+ 2.75 - 2.00] axis 180)
= + 2.00 + 0.75 × 180

Plus-Cylinder Technique

If the second meridian is to be neutralized with a plus-cylinder lens (as is done with a plus-cylinder phoropter or loose lenses and trial frames), the first spherical lens should be left in the phoropter or trial frames. The axis of the cylindrical lens is oriented in the direction of the axis of the streak for the second meridian. Because a cylinder lens is being used, no power is being added along the axis of the second meridian (which, of course, corresponds to the power of the first meridian). When the neutralization reflex is found for the second meridian, the streak is rotated 90 degrees to ensure that the first meridian is still neutralized. The working distance is then subtracted from the spherical lens, and the spectacle prescription is easily determined as follows:

  Q: A patient is neutralized with the following lenses at a working distance of 66 cm: [+ 3.50 sphere] and [+ 0.75 axis 180]. What is the eyeglasses prescription?
  A: Step 1: Subtract the working distance from the spherical lens only. In this case, the working distance is 66 cm, which is equal to 1.50 D:
[+ 3.50 sphere] - 1.50 = + 2.00 sphere
  Step 2: Add the cylindrical lens to the new power of the spherical lens:
+ 2.00 sphere + [+ 0.75 axis 180]
= + 2.00 + 0.75 × 180

Minus-Cylinder Technique

Some clinicians prefer to work in minus cylinder. Patients are neutralized in the same aforementioned manner, except that the more “with” or less “against” meridian is neutralized first with spherical lenses. Then the less “with” or more “against” meridian is neutralized with a minus-cylinder in much the same way as the previous example used a plus-cylinder lens. The transposition is done as follows:

  Q: A patient is neutralized with the following lenses at a working distance of 66 cm: [+ 4.25 sphere] and [-0.75 axis 90]. What is the eyeglasses prescription?
  A: Step 1: Subtract the working distance from the spherical lens only. In this case, the working distance is 66 cm, which is equal to 1.50 D:
+ 4.25 sphere minus 1.50 = + 2.75 sphere
  Step 2: Add the minus cylindrical lens to the new power of the spherical lens:
+ 2.75 sphere + (-0.75 axis 90)
= + 2.75 - 0.75 × 90

Back to Top
TECHNIQUES TO EVALUATE ASTIGMATISM
It should be intuitive that it is easier for the retinoscopist to evaluate a bright, thin reflex than a dim, broad one. There are various techniques that enable one to alter the system so that a brighter reflex is observed. These techniques include increasing the brightness of the bulb, increasing the diameter of the peephole, dilating the pupil, and decreasing the working distance. However, it is even more useful to make the light reflex not only brighter, but also thinner, especially when evaluating astigmatism.

At working distance, the pupil is completely or almost completely filled with light when an emmetropic or mildly hyperopic eye is examined with the retinoscope sleeve all the way down (Fig. 23). This was noted in the section on retinoscopic neutralization. The pupil is filled because the retinal image is magnified to a size at which it is actually larger than the pupil. Enhancement techniques involve altering the magnification of the retinoscopy reflex to make it appear as thin as possible. No discussion of these techniques can be undertaken unless the reader has a solid understanding of the optics of the magnification properties of the eye in the context of retinoscopy.

Fig. 23. The relative magnifications and distances (from the subject's eye) of images of the retinoscope filament when observing the image “of the retina” in hyperopic eyes. The eye may be considered the hyperopic version of the schematic eye shown in Figure 16. The magnification is calculated as the ratio of distance from the image of the retina to the subject's pupil divided by distance from the pupil to the retina. A. Cone to which the observer's view is restricted by the subject's pupil. Its apex is at the observer's pupil (x) and its angular dimension is determined by the subject's pupil (y). The lengths of the vertical solid bars traversing the cone represent the widths of the images of the filament at several distances from the eye. The segment of the bar that lies within the cone is visible to the observer. B. Proportion of the filament image that can be seen by the observer represented in another form. The filament image (cross-hatched area) rapidly increases as the ametropia decreases. Beyond approximately 1.00 D, the edges of the filament image cannot lie within the cone, and enhancement cannot occur. Enhancement can occur in eyes with 2.00 D or more of hyperopia. The filament image seen through the subject's pupil is shown as a dark band. The retina is located 0.02 m from the subject's pupil. Consider the extreme example of + 50.00 D, in which the “image of the retina” is “on the retina.” It would appear as a very small and bright line that would not fill the pupil. A 50.00-D refraction at 1/50 of a meter = 2 cm. (Modified from Safir A: Retinoscopy. In Tasman W, Jaeger EA [eds]: Duane's Clinical Ophthalmology. Philadelphia: JB Lippincott, 1982.)

The technique of raising the sleeve to thin and brighten the reflex in evaluating spherical and astigmatic hyperopia is called enhancement (Fig. 24). A sharply focused filament reflex can be seen in the pupil when the sleeve is incrementally raised toward the point at which the emanated beam becomes parallel and enters an eye and working distance lens that still requires more than 1.50-D hyperopic correction. This occurs because the focal point of the retinoscope lies near the focal point of the patient's eye. This makes the width of the focused filament image on the retina essentially 0 and effectively prevents the appearance of a magnified image. Rotation of the sleeve will not change the width of the reflex if the eye has a spherical hyperopic refractive error. Only a thin reflex is seen in the pupil. Perhaps the most important and practical point about enhancement is this—if the reflex cannot be enhanced, there cannot be more than + 1.50 of residual hyperopia.

Fig. 24. Enhancement of hyperopia by raising the sleeve. Enhancement is one technique that combines changing in the illuminating system with properties of the viewing system. In hyperopic eyes, it is possible to narrow the beam on the retina sufficiently so that its borders can be seen despite the magnification (cross-hatched) of the viewing system. The amount that the sleeve is moved and the width of the facial intercept permit estimation of the amount of hyperopia. Moreover, meridional comparison is the basis for detection of hyperopic astigmatism.

Raising the sleeve decreases the divergence of the emitted streak. If this is done at working distance, the intercept or reflection on the patient's cornea and lid gets smaller. This appearance phenomenon is called the intercept. The width of the intercept can be used to estimate the amount of hyperopia as one learns the apparent ratio of the enhanced reflex to the width of the enhanced intercept (see Fig. 24).

MAGNIFICATION AND THE PUPIL

In ophthalmoscopic retinoscopy, all methods for detection of astigmatism depend in some way on the skill of the retinoscopist in creating, detecting, and maximizing the differential magnification of the retinoscopic images along the astigmatic axes. As noted in the introductory section on ophthalmoscopic retinoscopy, the thinnest, brightest image is seen when the far point of the retinoscope is conjugate with the far point of the patient's eye. Thus, the focal point of a plano eye will be conjugate with the focal point of a retinoscope held 5 cm from the patient with the sleeve positioned just above halfway up. At this point, the retinoscopist will see a thin, bright line while the sleeve is rotated in all directions, no matter how small the pupil. If the retinoscopist then recedes from the patient without moving the sleeve, she will soon note that the observed image widens until it eventually fills the pupil. At this time, she has left the world of ophthalmoscopic retinoscopy, where the observations depend on the system that illuminated the retina, and she has entered the world of neutralization retinoscopy, where observation depends on the viewing system. She now makes observations based on the relative magnification at different meridians of the images that originate from the luminous retina (see Fig. 23). The exact distance at which this happens is controlled by the pupil size.

The growth of the width of the reflex relative to the pupil has been compared with the view of a baseball game through a knothole in a fence. If the observer is placed a great distance from the knothole, the desired image is too wide for the small hole, and only a small proportion of the baseball field can be observed. To observe the entire field, the observer must bring her eye as close to the knothole as possible.

Optics of Magnification

The magnification equation is well known and relatively simple. Magnification is the ratio of the far point distance of the image to that of the object. Thus, in the case of an eye with 10.00 D of myopia, the magnification of the image at the far point is 5 (see Fig. 16). That is, based on the location of the image at 10 cm and the object at 2 cm, 2 cm is the distance between the dioptrics of the eye and the retina. (The term dioptrics collapses the combined effect of the cornea and lens and ignores the effects of refractive index, etc.) Because its image is at infinity, the magnification of a plano eye will be infinite (see Fig. 16). The optics of magnification for a hyperopic eye are shown in Figure 23.

If an eye has regular astigmatism with two far-point planes, it will have two different magnifications, depending on the difference between them. Thus, if one meridian were plano and the other either -2 or + 2, either of these meridians will have far points at 50 cm from the eye. The approximate magnification of the astigmatic meridian will be 50 ÷ 2, or 25. The astigmatic meridian will appear smaller than the infinite magnification of the plano meridian. The observer will detect astigmatism as the sleeve is rotated at the optimal height. Identification of plus or minus astigmatism depends on other techniques described elsewhere. The detection of astigmatism usually depends on meridian differences in image size (Fig. 25).

Fig. 25. Optics of meridional comparison for astigmatism Astigmatism is detected by observing meridional differences in the sizes of virtual retinal images projected into the far-point plane of a hyperopic eye. The diagram (not to scale) shows differences in the far point image sizes for an eye with compound hyperopic astigmatism requiring a net correction of + 2.00 D, + 2.00 D × 180 degrees. The unfocused filament image of the retinoscope is shown projected onto the retina in the vertical meridian only. The retina serves as an object for the images focused in the far-point plane of each meridian. Note that the largest image results from magnification because of its being focused at twice the distance from the nodal point of the eye as the smaller image. The scale measures distance (cm) posterior to the cornea. On the right are shown the retinal images as viewed by the examiner when the filament is alternately positioned on the principal meridians. The black ring represents the patient's pupil. When the filament is vertical, the pupil is almost flooded out. When the filament is horizontal, a much thinner line is observed. Moving the retinoscope further from the eye would cause both meridians to flood out the patient's pupil. (Weinstock SM, Wirtschafter JD: A Decision-Oriented Manual of Retinoscopy. Springfield, IL: Charles C Thomas, 1976.)

Magnification at Working Distance

In clinical neutralization retinoscopy, magnification is observed at 66 cm from the eye through the peephole of the retinoscope and the pupil of the examiner. In the condition of neutralization (e.g., an emmetropic eye examined with a + 1.50-D working distance lens) the eye is illuminated by a -2 divergent beam emitted from the retinoscope and converged by the + 1.50 lens to a wide beam on the retina. Ignore the illuminating system (it is irrelevant) and consider the observation system. The observation system consists of an eye with an object distance (from the dioptrics to the retina) of 2 cm and an image distance (from the dioptrics to the far point) of 66 cm. The magnification will be 66 cm ÷ 2 cm, or about 3.3X. This image will fill the pupil. Similar calculations of magnification can be performed to show that the image of mildly hyperopic eyes also is large enough to more than fill the pupil.

ENHANCEMENT TO DETECT ASTIGMATISM AND IDENTIFY PLUS-CYLINDER AXIS

Rotation of the sleeve does not change the width of the reflex if the eye has only a spherical hyperopic refractive error. However, if the eye is astigmatic, a sharp image can be seen along only one axis unless the eye is both hyperopic and astigmatic. The sharpest, brightest image is the least magnified whereas the widest, dullest image is the most magnified. The sharpest, brightest image is seen along the plus-cylinder axis so that an eye with the rule astigmatism will have a plus cylinder axis at 90 degrees and a vertical, thin, bright filament image will be seen if there is more than 1.50 D of hyperopia as the sleeve is raised. If raising the sleeve detects two bright lines at right angles at two different heights, the eye has both hyperopia and astigmatism (see Fig. 25). Assuming this finding occurs during neutralization at standard working distance, the retinoscopist should increase the amount of plus so that she is closer to the spherical end point. The amount of plus lens to add should be sufficient to eliminate enhancement in one meridian.

STRADDLING

Once astigmatism is detected, it is almost second nature to tune the sleeve to the axis at which the reflex is the thinnest and brightest and then to adjust the sleeve height and rotation to maximize the observation (Fig. 26). The reflex becomes thicker if the retinoscopist rotates the sleeve about 15 degrees to either side of the presumed cylinder axis. This technique is called straddling because the retinoscope beam is alternately rotated an equal angle on either side of the presumed cylinder axis. When the cylinder power is weak, straddling reveals an initial incorrect estimate of the axis location. The thinner image is called the “guide” because it guides us to adjust the plus-cylinder axis toward the thinner image. This step provides the initial detection of astigmatism, and the phoropter axis can be adjusted so that plus lenses can be dialed into place along the enhanced meridian.

Fig. 26. Straddling. The straddling meridians are 45 degrees off the glass axis, at roughly 35 and 125 degrees. As you move back from the eye while comparing meridians, the reflex at 125 degrees remains narrow (A) at the same distance that the reflex at 35 degrees has become wide (B). This dissimilarity indicates axis error; the narrow reflex (A) is the guide toward which we must turn the glass axis. (Corboy JM: Refining the cylinder. In Corboy JM [ed]: Retinoscopy, p 91. 4th ed. Thorofare, NJ: Slack, 1996.)

BREAK PHENOMENON

Astigmatism can also be detected by observation of the break phenomenon. The break phenomenon is similar to straddling with the enhanced beam. It is useful in refining the axis of large astigmatic cylinders because one can observe a discontinuity, or “break,” between the enhanced intercept axis and that of the retinal reflex when the retinoscope filament beam is rotated somewhat away from the correct cylinder axis (see Fig. 22). Both the guide and the break phenomenon during straddling serve to identify the astigmatic axis.

ENHANCEMENT TO ESTIMATE PLUS-CYLINDER POWER

It is useful to observe the intercept reflection of the retinoscope beam from the surface of the phoropter as the sleeve is raised. The intercept narrows as the sleeve is raised and can be used to light the number axis numbers and markings (see Fig. 24). The decreasing width of the intercept can be observed as the sleeve is raised to the point of best enhancement. The retinoscopist can use the observed width of the intercept and the height of the sleeve to provide a rough estimate of cylinder power with the best enhancement is seen. Using this technique, the retinoscopist can detect any amount of hyperopia from + 1.50 D to + infinity. For practical purposes, the sleeve should not be raised beyond the plano (parallel beam) position or you will be in myopic territory with a convergent beam. As you adjust astigmatic power and axis, you can alternately repeat enhancement until cylinder axis and power are no longer detectable. The retinoscopist then proceeds to refinement.

REFINEMENT OF NEUTRALIZATION RESULTS

The retinoscopist may choose to refine by neutralization at all meridians, as described previously in the neutralization section of this chapter, or she may choose to use some or all of the following special techniques:

  1. Observe the intensity of the unenhanced band to refine cylinder power. Rotate the sleeve when it is in the completely down position. If the two astigmatic meridians are not equally bright (or dull), make them even by adding + 0.25 D to the bright one or subtracting + 0.25 D from the dull one. This technique may be performed first by moving forward from the working distance to a point about 20 cm closer to the patient's eye. At this distance, a reflex will not fill the pupil. As you recede, the reflex will flood out beyond the pupil; it is at this point that it is best to observe for any differences in intensity. Repeat the step to confirm that equal intensity is observed along all meridians.
  2. Observe the intensity of the unenhanced band to refine cylinder axis. If the previous step did not resolve the detected asymmetry, recheck the axis. Simply move in again and locate the optimum distance that maximizes the asymmetry. Straddle the presumed plus-cylinder axis and note the thinnest or brightest meridian and turn the plus-cylinder axis in that direction. Then repeat the power refinement described in the previous step.
  3. Observe the skew phenomenon of the unenhanced band to refine cylinder axis (see Fig. 27). This is the only test of cylinder axis location that does not involve straddling or rotation of the streak from the presumed cylinder axis. The test is basically more useful to confirm cylinder axis than to determine it. It consists of sweeping the streak (without rotation) to either side of the presumed axis. If the axis is correct, the reflex and the intercept move parallel with each other; but if the axis is not correct, the reflex deviates from the intercept and appears to be “skewed.” The skew phenomenon detects far smaller abnormalities of cylinder axis than the break phenomenon. The two differ in that skew is performed without rotation of the filament axis and cannot be observed except when the retinoscope is moving.

    Fig. 27. Skew (oblique motion). The arrows indicate that movement of the reflex and intercept are not parallel. The reflex and intercept do not move in the same direction but are skewed when the streak is off axis. (Corboy JM: Refining the cylinder. In Corboy JM [ed]: Retinoscopy, p 89. 4th ed. Thorofare, NJ: Slack, 1996.)

The Skew Phenomenon: An Optical Illusion

Michaels2 has explained as an optical illusion the oblique motion seen in astigmatism that prompted the development of retinoscopy. Try the experiment he proposed. Observe a pencil held at 45 degrees through a 2.5-cm hole in a piece of paper held 25 cm from your eye. Sweep the pencil horizontally behind the hole and observe that the pencil seems to move obliquely. The oblique reflex motions and the break phenomenon observed in astigmatism as a consequence of the “conoid of Sturm.” The magnification of the retinal reflex varies in each meridian. Only when the retinal reflex and the intercept are aligned do they form an unbroken line. Movement of the streak along any other meridian produces an oblique reflex motion.

Back to Top
RELIABILITY
In a previous edition, Safir noted that retinoscopy is the best method for objectively evaluating the dioptric state of the eye.1 Much of what follows is quoted verbatim. Retinoscopy, however, measures only one aspect of refraction—the optics that are necessary to place images of distant objects in sharp focus on the retina. It does not measure the rest of the subjective visual experience. Retinoscopy should, therefore, be combined with subjective refraction whenever possible.

STATISTICAL CONSIDERATIONS

The less cooperative the patient, the greater the reliance on objective observations. In the extreme case of poor cooperation—for example, the young child or mentally challenged patient—sedation or even general anesthesia may be necessary. In cases that are not quite so difficult, the practitioner who is very skillful with a retinoscope has a great advantage over the practitioner who is not. This situation is the one that truly rewards the retinoscopist who can quickly and accurately determine a patient's refractive error through the techniques of ophthalmoscopic retinoscopy and neutralization retinoscopy.

Because important therapeutic judgments may depend on the retinoscopic measurements, it is necessary to know how reliable these measurements are.12 Reliability and precision are terms that describe the degree to which repeated measurements resemble one another. For example, five repeated measurements for one patient might yield the following five spherical results: + 2.25, + 2.75, + 2.50, + 2.75, + 2.25. With another examiner, the following values might be found: + 1.75, + 2.50, + 3.25, + 2.75, + 2.25. The first examiner displays a higher degree of reliability or precision than the second one. Nevertheless, the average value is the same for both: + 2.50. If any single measurements had been accepted as the patient's true refractive error, the patient might have been misjudged by only ¼D by the first examiner, but by as much as ¾D by the second.

How is it possible, then, to judge the reliability of any measurement? The answer is straightforward: There must be repeated measurements so that the variability of the measurements can be assessed. The repeated measurements should be independent of one another, each derived without the measurer having knowledge of what the preceding ones were. These are usually called “replicate measurements,” and there is no way to judge reliability without them. In clinical practice, we often do these replicate measurements informally and almost intuitively.

Fluctuations in the measurement process are unavoidable; statisticians call them “error.” The second examiner in the previous example is less precise than the first. She showed greater variability and larger error.

Reliability and error for retinoscopy have been evaluated. One study by Safir and coworkers entailed five clinicians performing retinoscopy on ten healthy young subjects on two separate occasions separated by one to three weeks.13,14 Results showed a 50% probability that the two measurements of spherical power would differ by 0.40 D. The Safir study also showed a threefold difference in reliability among retinoscopists.

Accuracy is another concept that is important in the understanding of measurement. Accuracy is the physical scientist's term for the quality that psychologists call validity. Accurate measurements are those that are close to the “true” value being measured. Accuracy is a relative concept; one procedure may be more or less accurate than another. Suppose, for example, that a subject's true spherical refractive error were 2.00 D, and that ophthalmologist A measured it five times as 2.25, 2.25, 2.00, 2.00, 1.75, whereas ophthalmologist B got values of 2.5, 2.5, 2.75, 2.75, and 3. It is apparent that the method of ophthalmologist A is more accurate than that of ophthalmologist B. The typical measurement for ophthalmologist A is closer to the quantity sought than that of ophthalmologist B, even though the precision of the two refractionists is about the same. This example shows that there is no predefined relationship between precision and accuracy.

Retinoscopy is better at measuring cylinder than sphere. It is most sensitive for cylinder axis, next for cylinder power, and poorest for sphere power. It is sobering to realize that our ability to judge spherical power may be rather limited. If the patient is uncooperative (e.g., a restless child) and the examiner must work quickly, the error is likely be even higher. Young retinoscopists must also resist the temptation to accommodate through the retinoscope when evaluating a difficult patient because this further decreases both reliability and accuracy. We can only guess, but errors of 1.00 D or more must be commonplace.

THE ROLE OF THE RETINOSCOPE IN A MODERN EYE CLINIC

In the 21st century, we are faced with an ever-more automated world, and the ophthalmic practice has paralleled this move toward automation. The retinoscope, really little more than a light filament, lens, and mirror, is now joined by many more sophisticated (and certainly more expensive) devices developed to help us obtain information regarding the refractive state of our patients. One family of such instruments consists of the automated refractors—tabletop or hand-held devices that perform an objective refraction in a matter of seconds at the touch of a button. The largest advantage of the automated refractor is that clinic personnel who have almost no knowledge in the art of refraction can use it. For the average patient, automated refractors are reasonably accurate when compared with the retinoscope and generally agree within ½ D.15,16 If automated refractors err, they tend to overestimate minus sphere by a fraction of a diopter. This discrepancy probably stems from the fact that patients accommodate in response to their sense that the automated refractor is at a closer distance to the patient than is the 6 meter far point used in retinoscopy. This is true even though the devices are designed to relax accommodation while fixing on an artificial distant target.

Where the automated refractor is at an undeniable disadvantage to the retinoscope is in evaluating patients with irregular astigmatism, either from pathology (e.g., keratoconus, pellucid marginal degeneration) or postsurgically (e.g., corneal transplant, laser in situ keratomileusis [LASIK]). All the automated refractor operator can do is press a button while having the patient fixate on the target. The automated refractor then either calculates a “best fit” refraction or flashes an error message that there too much irregular astigmatism exists to make a reading. The retinoscopist, however, can gain much more information about the refractive state of the patient by judging the quality of the light reflex observed in the patient's pupil. A skilled retinoscopist usually can deduce quantities and qualities of astigmatism in patients for whom the automated refractor fails. This is especially true in patients with poor best-corrected visual acuity.

Other instruments that must be compared with the retinoscope are the keratoscope17 and the automated corneal modeling systems. Although it is tempting to compare these instruments with the retinoscope because they each provide important information regarding astigmatism, it must be remembered that these instruments serve different purposes within the ophthalmic practice. The keratoscope and corneal topographers are used to evaluate corneal astigmatism only. The retinoscope, however, is used to determine the entire refractive state of the eye. These instruments all have their place and can complement each other well.

A final issue, one that is becoming more important with every passing year, is the role of the retinoscope in managing the refractive surgery patient. Few studies address this problem. Retinoscopy has been shown to be accurate in evaluating the postoperative patient.18 Anecdotally, we agree with these results. In our practice, we rely heavily on retinoscopy in evaluating pre- and postoperative refractive surgery patients. We believe that automated refractors cannot accurately evaluate the refractive state of someone with a surgically altered cornea and therefore believe that they have no role in providing data on these patients. Other studies have shown that corneal topography alone is not adequate in evaluating patient satisfaction after laser refractive surgery.19 Remembering that the critical zone of the retinoscopy reflex is the central 3 mm, and that the average excimer laser ablation diameter is 6 mm, one can see that the retinoscope is well suited to evaluate these patients.

When patients who had previously had corneal refractive surgery subsequently undergo cataract extraction with intraocular lens (IOL) implantation, there is more variability in the postoperative refractions than for typical cataract patients. The IOL calculations rely not on retinoscopy (objective refraction), but instead on keratometry (corneal curvature) and a-scan ultrasonography (axial length). One can only wonder if the diagnostic procedure of choice for these patients might someday be for the surgeon to remove the cataract, perform intraoperative retinoscopy of the aphakic eye, calculate the necessary lens power, then place the desired IOL implant. In that way, the IOL would depend on the patient's refractive state rather than on artificial calculations based on the patient's altered ocular anatomy.

Back to Top
REFERENCES

1. Safir A: Retinoscopy. In Tasman W, Jaeger EA, eds: Duane's Clinical Ophthalmology. Philadelphia: JB Lippincott, 1982

2. Michaels DD: Visual Optics and Refraction: A Clinical Approach, pp 357–376. 2nd ed. St Louis: CV Mosby, 1980

3. Rubin ML: Optics for Clinicians. 2nd ed. Gainesville, FL: Triad Science Publishers, 1974

4. Corboy JM: The Retinoscopy Book, pp 1–6. 4th ed. Thorofare, NJ: Slack, 1996

5. Weinstock SM, Wirtschafter JD: A Decision-Oriented Manual of Retinoscopy. Springfield, IL: Charles C Thomas, 1976

6. Kettesy A: Uber die theorein der skiaskopic anlasslich ihres 100 jahrigen bestehens. Klinisch Monatsblauer fur Augenheilkunde 162:26–33, 1973

7. Millodot M: A centenary of retinoscopy. J Am Optom Assoc 44:1057–1059, 1973

8. Safir A: Some retinoscope reflections: The instruments. Surv Ophthalmol 18:62–70, 1973

9. Copeland JC: Streak retinoscopy. In Sloane AE (ed): Manual of Refraction. 2nd ed. Boston: Little, Brown, 1970.

10. Copeland JC: The refraction of children with special reference to retinoscopy. Int Ophthalmol Clin 3:959–970, 1963

11. Pascal JI: The “incidence neutral” point in retinoscopy. Arch Ophthalmol 39:550–551, 1948

12. Hyams L, Safir A: Statistical concepts in refraction. Int Ophthalmol Clin 11:103–114, 1971

13. Safir A, Hyams L, Philpot J et al: Studies in refraction: I. The precision of retinoscopy. Arch Ophthalmol 84:49–61, 1970

14. Hyams L, Safir A, Philpot J: Studies in refraction: II. Bias and accuracy of retinoscopy.Arch Ophthalmol 85:33–41, 1971

15. Salvesen S, Kohler M: Automated refraction: A comparative study of automated refraction with the Nidek AR-1000 autorefractor and retinoscopy. Acta Ophthalmologica 69:342–346, 1991

16. Grosvenor T, Perrigin DM, Perrigin J: Three-way comparison of retinoscopy, subjective, and Dioptron Nova refractive findings. Am J Optom Physiol Opt 62:63–65, 1985

17. Rowsey JJ, Fowler WC, Terry MA et al: Use of keratoscopy, slit-lamp biomicroscopy, and retinoscopy in the management of astigmatism after penetrating keratoplasty. Refract Corneal Surg 7:33–41, 1991

18. Nagy ZZ, Suveges I, Senyi K et al: Retinoscopy after excimer laser photorefractive treatments. Acta Chir Hung 35:307—313, 1995-6

19. Kampmeier J, Tanzer DJ, Er H et al: Significance of corneal topography in predicting patient complaints after photorefractive keratectomy. J Cataract Refract Surg 25:492–499, 1999

Back to Top